Thursday, January 26, 2012

~ Tutorial ~ How to make Groovy Tye-Dye Cupcakes Decorating Tutorial


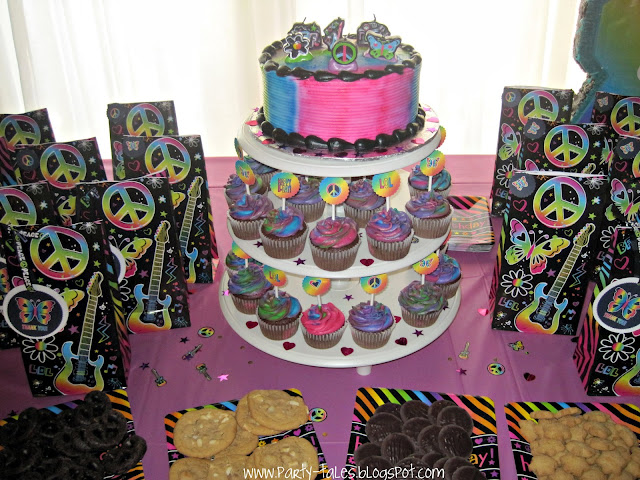
As seen on Valeria's 6th 'Groovy Neon Doodle Party'


I made these for Valeria's 6th B-day Party a couple of weeks ago.  The theme of the party was inspired by the 'Neon Doodle' Party supplies collection from Birthday Express.  

 To get the Tye-Dye effect I just tinted buttercream icing in 4 different colors. 
I filled my piping bag by scooping in spoons of all different colors until full and then I piped on cupcakes. 


To make Buttercream icing to frost 24 cupcakes you'll need:
8 cups (1 kilo ) of icing sugar
 (2 sticks or 250ml) of butter, softened
2/3 cup (150ml) of milk
2 teaspoons (10 ml) of vanilla extract

In a bowl beat butter until fluffy. {In low speed- so sugar doesn't blow everywhere} Beat in sugar alternately with milk, making 3 additions of sugar and 2 of milk. Beat in vanilla extract.

Now divide Buttercream icing in 4 batches and color with gel food color.  {Color carefully, just a little big goes a long way - 1/8 of a teaspoon or less will do}


I used a cake mix for my cupcakes and made my own buttercream with the recipe above.
I put together the picture sequence below to show anyone who feels intimidated to use a piping bag that is not something difficult to do and you don't need to be a
baker to do this. 


  I wanted to show you how to put together a piping bag.  You need the bag, the metal tip {I used a Wilton 1M} and a large size Coupler {which is the white pieces and consist of 2 parts a ring and a base}

1. Remove ring from coupler base. Insert coupler base into the bag and push it as far as it goes.

2. Mark with your scissors the spot where you are going to cut. Just a little bit under the first screw thread.

3. Push coupler base back up just so you can cut and push down again.

4. Put metal tip on the outside and secure with coupler ring.

5. That's it. I fold my piping bag over a glass, I just find it easier to fill that way. Now just fill your piping bag with the buttercream icing.  I just filled with a little bit of each color and piped on cupcakes. 
6. To make the swirls start at the outer edge of the cupcake, work inward to the middle and up.


You can purchase all the supplies at Michaels, Walmart, Bulk Barn or any other baking supplies store. 
I hope you enjoy my tutorial and if you haven't tried before, try it out, I promise you piping is so much fun!

Tuesday, January 17, 2012

~ Birthday Party ~ Groovy Neon Doodle Birthday Party


I am so excited to share this gorgeous party with you today! Valeria turned 6 this past weekend and her mom and my friend Timmy asked me to style the celebration and I was so happy to help!

We liked the colors and theme of the 'Neon Doodle' party supplies from Birthday Express.  We just added a few personal touches to make it extra special, like personalized cupcake toppers, thank you cards and water bottle labels to match with the theme.


Timmy asked me to make a 'yummy-gummy pot'. They were a hit at her last party, and she wanted them again.  I wrapped a napkin inside the glass vase and it looked so cute! {So simple and easy, if you haven't seen the Tutorial, just follow the link here}


We ordered the cake from a local supermarket, we asked them to air brush the cake with rainbow colors and I made Tye-Dye cupcakes and designed the cupcake toppers to match. {Tutorial here}


How cool is this Guitar shaped Pinata!


I added some made to match Thank you Cards to Favor Bags and
made coordinated Water Bottle Labels.

All the 'Neon Doodle' made to match personalized party printable files are now available at my Etsy shop.  {Click here for instructions on how to use your party printable files}

Everything looked so cute and Valeria and her friends enjoyed the party.  Thanks Timmy!


Linking up to Bird's Blog linky party
Pin It


Sunday, December 18, 2011

~ Free Printables ~ Merry Christmas Kids Mini Tags

We just finished doing small Christmas presents for my daughters' school friends. 
I designed these mini labels to attach to the bags.

I made them to coordinate with the 'Reindeer Magic Food labels' since they will be receiving both together.

 You can use them as well, I left a blank space just so you can add your kid name. 


Click here to download
{Note: The picture doesn't look clear when you download the file but it will print perfect} 

Saturday, December 17, 2011

~ Free Printables ~ Reindeer Magic Food Labels


Last year one of my daughters' teacher sent home a small bag with Reindeer Magic Food and instructions to be sprinkled on our lawn on Christmas Eve and I thought it was such a sweet and fun idea.

My daughter reminded me this year that we needed to have food for the Reindeers to eat while Santa comes inside. We made them together last night, they helped mixing the food and filling the bags. Such an easy little project to do together! She also told me to make sure we leave lots of cookies for Santa so he takes longer eating and maybe she can catch him this time!
I just thought it would be nice to send some for her school friends too so I designed these labels to attach to the food. 

 
To make these you need:

{Reindeer food } Oats and sugar sprinkles
Clear treat bags or Ziploc bags
Small hole punch or double sided tape to attach labels
Printable Labels {Free Download here}
Ribbon


Now off to bake cookies for Santa!

Wednesday, December 14, 2011

~ Party Printable ~ HELLO KITTY Party circles {Cupcake toppers, favor tags} Free download

I adore Hello Kitty and recently had the opportunity to design these party circles and thought that you would like them too.

If you have a Hello Kitty themed party coming soon feel free to use these. 


 Personalized printable {cupcake toppers, water bottle labels, favor tags, thank you cards and invitations} can be ordered @ my etsy shop. 


If you love Hello Kitty you will like to see my daughter's 
Hello Kitty 'balloon dreams' birthday Party.

Pin It
Related Posts Plugin for WordPress, Blogger...